DIY IOT Heated Towel Rail Timer
In order to save electricity I made a heated towel rail timer, and, because its 2019, made it controllable through a web page available on my home network. This project cost less then half the price of a basic timer. Here is how I did it and how you can leverage my experience and avoid some pitfalls. NOTE THIS PROJECT USES MAINS VOLTAGES, COULD BE DANGEROUS AND MAY NOT BE LEGAL TO IMPLEMENT IN YOUR COUNTRY.
Update – 2021/06 – While this project was cool, and it gives me joy every time I use it, I did not know about TASMOTA when I did it. Were I to try this again, I might simply flash Tasmota on it, and set up some timers (although I do like how turning it off and on at the plug starts the heating cycle, and I’ve not played with rules or timers, although there does appear to be an “ON Power1#boot” rule)
The heart of the project is a Sonoff Basic – which comprises of an ESP8266 micro-controller with its 802.11n WIFI, some power handling circuitry and a relay. It nominally takes 2 wires in with mains voltage (ie live & neutral) and turns on/off the output depending on its program. I purchased a couple of these units from Ali-express for around US$5 each. I also purchased an FT232RL controller for about US$1.50 to program them.
There are a number of instructions on wiring and programming the SonOff using the Arduino platform online, and this is what I followed. I followed an instruction at https://randomnerdtutorials.com/reprogram-sonoff-smart-switch-with-web-server/ which worked well, although my board layout was slightly different, and I elected to use a male rather then female header on the board, and did not bother with the switch.
Here is a picture of my board, hooked up to the FT232RL controller –
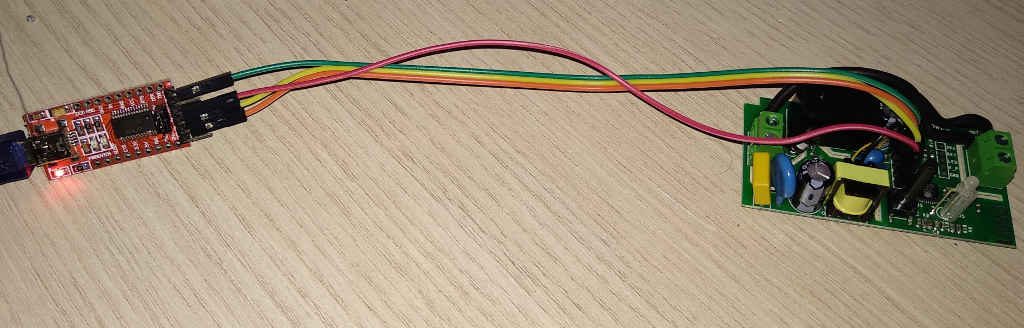
The next step was upgrading my version of Arduino platform to 1.8.9 and adding the ESP8266 libraries. (The Sonoff presents as a generic ESP8266 board).
I decided I wanted my towel rail to, by default, turn on for 30 minutes and off for 90, always turning on at startup so that it could easily be used manually. Integrating this with the simple ESP8266 was a bit of a challenge, and not ideal, but the following solution works well for me:
/*********
  Rui Santos
  Complete project details at https://randomnerdtutorials.com
  Modifyed by DavidGo to work as a controllable monostable vibrator.
*********/

#include <ESP8266WiFi.h>
#include <WiFiClient.h>
#include <ESP8266WebServer.h>
#include <ESP8266mDNS.h>

MDNSResponder mdns;

// Replace with your network credentials
const char* ssid = "SSID";
const char* password = "PASSWORD;

// Duty cycles in seconds
int timeon = 60;
int timeoff = 120;
// 100 - centiseconds taken to process web server
int processwait = 10;

ESP8266WebServer server(80);

// String webPage = "";
// int dgstatus = 0;

int gpio13Led = 13;
int gpio12Relay = 12;

void setup(void){


  // preparing GPIOs
  pinMode(gpio13Led, OUTPUT);
  pinMode(gpio12Relay, OUTPUT);
  RelayOn();


  Serial.begin(115200);
  delay(5000);
  WiFi.begin(ssid, password);
  Serial.println("");

  // Wait for connection
  while (WiFi.status() != WL_CONNECTED) {
    delay(500);
    Serial.print(".");
  }
  Serial.println("");
  Serial.print("Connected to ");
  Serial.println(ssid);
  Serial.print("IP address: ");
  Serial.println(WiFi.localIP());

  if (mdns.begin("esp8266", WiFi.localIP())) {
    Serial.println("MDNS responder started");
  }

  server.on("/", [](){
    server.send(200, "text/html", ShowStatus());

  });
  server.on("/on", [](){
    RelayOn();
    server.send(200, "text/html", ShowStatus());
    delay(1000);
  });
  server.on("/off", [](){
    RelayOff();
    server.send(200, "text/html", ShowStatus());
    delay(1000);
  });
  server.begin();
  Serial.println("HTTP server started");
}

void loop(void){

  RelayOn();
  for ( int i=1; i<timeon*100; i++)
  {
       delay(processwait);
       server.handleClient();

  }
  RelayOff();
  for ( int i=1; i<timeoff*100; i++)
  {
       delay(processwait);
       server.handleClient();

  }
}
After extensive tweeking and testing, I was ready to install this behind my heated towel rail. Surprisingly this turned out to be the hardest part of the project.
One step not mentioned above is going into my router and assigning the SonOff a static IP address. This allows me to go to the HTTP webpage, view its status, turn it on and off and modify the on/off duty cycle. Of-course, less sophisticated users can simply turn the device off and on again to restart it with an on time of 30 minutes.
FIRST OFF, MAKE SURE TO TURN OFF THE MAINS POWER BEFORE DOING THIS. Also be cognizant that you are working in a bathroom and water and electricity do play nicely together.
The Sonoff is fairly big, and was very difficult to mount behind the faceplate. Were I to do this again, I would ensure longer leads on both sides of the device to give it more play.
I also added a pilot indicator light (which I also bought from Ali Express. The nice thing was that this was 10mm round, so easy enough to install on the faceplate. The negatives are (a) It is aa green light, but look yellow when on, (b) is quite deep, and I did not take this into account when mounting it in the faceplate – I had to mount the faceplate upside-down as I did not want to drill through tile.
My final project looks as follows:
